Women are fond of jewelry and possess ample of jewellery pieces. From casual to occasion wear, there are uncountable and unmanageable jewellery items we have! We store all our precious jewelry items in our cupboards but there are some casual and regular jewelry pieces which we often misplace. You can arrange and store these jewellery pieces comfortably in a DIY jewellery organizer made from plastic balls! Let’s learn to make a multi-storage jewellery box from plastic balls!

Things You Need To Make A DIY Jewellery Organizer From Plastic Balls

- Plastic balls
- Cardboard box
- Glitter sheets
- Printed sheets
- Plastic bottle caps
- Adhesive
- Decorative beads
- Pearls
- Rubber bands
- Scissors
- Pencil
- Cutter
- Glue gun
Learn – How To Make Ice Cream Sticks Jewellery Box!
Steps You Need To Follow For Making A DIY Jewellery Organizer From Plastic Balls
Step 1-

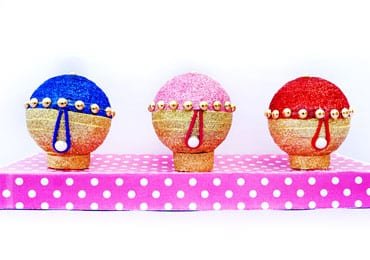
Let’s start with the plastic ball. Take the plastic ball and cut it into 2 halves using a cutter. Now take 3 different glitter sheet pieces and stick half portion on the upper half of the ball while half portion on the lower half using glue. This will make the ball easy to open. Perform this with all the three plastic balls.
Step 2-

Now take 3 different plastic bottle caps. Stick the bottle caps on the plastic ball using glue and let it get dry. Now take the glitter paper sheet. Cut the glitter paper sheets into 0.5mm strips. Apply glue on the ball and stick the thin glitter strips on it. Keep on wrapping the strips in the bottom part of the ball until the entire base portion is covered with the glitter sheets. Also, wrap the glitter sheet on the plastic bottle cap using glue. Wrap the yellow glitter sheet strip on the base of all balls.
Step 3-

Now, take another glitter sheet of the different shade. Start wrapping the top portions of the balls with the red glitter strips. Wrap the glitter strips until the entire surface of the balls is covered. Once the wrapping is done, take rubber bands and cut the rubber bands from the centre. Stick the bands in the inner portion of the ball using glue. Take the measurement and stick a huge bead or pearl on the outer bottom portion of the ball. Perform this with all the three balls.
Let’s see – 5 Super Awesome Recycled DIY Crafts Just for You!
Step 4-

Once balls are decorated, it’s now time to decorate the balls. Start sticking bead lace on the ball using glue. Stick the beads on the upper portion of the three balls. Now take a cardboard box and take the measurements of this box on the printed sheet. Stick some glue on the cardboard and stick the printed sheet. Cut the remaining printed sheet and give the cardboard box a fine finishing. Now the base is perfectly developed to hold our decorative balls. Now place all the three ball organizers on the cardboard box and stick them with glue. Stick a pearl or bead on the top of the ball.
Let all the three balls stick on the box on the plastic ball cap. Here’s an amazing organizer you can use for multiple purposes!
You can use this amazing and fancy jewellery organizer to store all your jewellery items. Store the earrings, bracelets, hair accessories and small items in this cool organizer and you will be able to locate and store all your needy items quickly!
Article Tags: Best Out Of Waste Craft · Cardboard Organizer · DIY Jewellery Organizer · DIY Organizer · Mini Organizer · Organizer From Plastic Balls · Recycled Craft Ideas